

Roof truss bracing must remain part of the erection plan from the moment the first truss leaves the stack. Trussed rafters gain stability from the completed roof system, not from one isolated component. Site teams therefore need to manage temporary support, erection sequence, permanent bracing and restraint as connected activities. Clear information and disciplined checks help protect people, products and the finished structure.
Understand temporary and permanent roof truss bracing
Temporary bracing stabilises trusses while installers erect the roof and add the components that create the permanent system. It needs to resist movement during the incomplete stage, when wind and construction activity can affect the frame.
Permanent bracing forms part of the completed structural arrangement. Longitudinal binders, diagonal bracing, restraint and other specified elements work with the trusses, battens and supporting structure. Their exact configuration depends on the project design and applicable guidance.
Do not treat temporary bracing as a substitute for the permanent arrangement. Equally, do not assume that a few permanent members will stabilise an incomplete run during erection. The method statement should cover both stages and show how the team will move safely from one to the other.
Plan stability before delivery
The erection team needs current layout drawings and relevant bracing information before work begins. Review truss spans, heights, special forms and girder positions. Identify hips, valleys, attic zones and other areas where the sequence may change.
Confirm that wall plates, masonry, frames, beams and other supports have reached the required condition. Check dimensions and levels before placing trusses. If supports do not match the approved design, resolve the discrepancy rather than altering the trusses.

Store and lift trusses without damage
A stable installation starts with careful handling. Support stacked trusses correctly, keep them clear of damaging ground conditions and prevent unauthorised movement. Follow the supplier’s guidance for vertical or horizontal storage as appropriate to the site arrangement.
Inspect components before lifting. Look for split timber, distorted connector plates or other damage. Keep labels visible so the erection team can identify each truss against the layout.
Use suitable lifting equipment and agreed attachment points. Long trusses may need lifting accessories that control distortion. Avoid dragging, dropping or levering components into place. If a truss has suffered damage, isolate it and contact the supplier for technical advice.
Establish the first truss accurately
The first truss sets the reference for those that follow. Position it at the correct location, line and level, then secure it with a planned temporary system. A loosely supported first truss gives the rest of the run an unreliable reference.
Work progressively. Install the next trusses at the specified centres and connect them to the temporary arrangement. Check plumb, spacing and alignment as the run develops. Do not erect a large number of unsupported trusses and plan to straighten them later.
Temporary bracing needs suitable timber, fixings and anchorage. Random offcuts or lightly fixed battens may not provide dependable restraint. The principal contractor and erection team should agree the method for the actual roof and site conditions.
Follow the approved bracing drawings
Project drawings and current industry guidance should govern the permanent roof truss bracing. Common elements may include longitudinal binders and diagonal braces to specified rafter, ceiling-tie or web zones. The locations and fixing requirements matter.
Install braces in continuous, effective lines where specified. Use the correct size, grade and fixing pattern. Ensure joints and laps follow the detail. A brace that stops short, changes direction without support or misses its intended trusses cannot perform as designed.
MiTek provides separate information for specifiers and for site use in its roof technology resources. The Trussed Rafter Association also publishes installation guidance. These resources support planning, but the project-specific engineering information always takes priority.

Coordinate gable restraint and supporting walls
Roof stability depends on the connection between trusses and the supporting building. Wall-plate straps, gable restraint, masonry details and timber-frame connections need coordination across trades.
For masonry construction, check that restraint straps, blocking and fixings match the design. Avoid gaps that prevent straps from bearing properly. For timber frame, use the specified connections and confirm that the frame itself has the required stability before depending on it to support roof erection.
Give special trusses special attention
Girder trusses, truncated girders, attic trusses and other special components often carry greater loads or connect several roof zones. They may need multiple plies, specific bolts or nails, proprietary brackets and detailed bearings.
Identify them during the pre-start briefing. Check that all plies and connections match the manufacturing and installation information. Do not omit a fixing because access becomes difficult after surrounding trusses arrive.
Hips and valleys also need a logical sequence. Lay out diminishing trusses and infill members against the drawing. Ensure supports and connections are in place before transferring load. Complex junctions reward careful checking because an early positional error can affect tiles, fascias and ceilings later.
Protect engineered components from alterations
Roof trusses must not be cut, drilled, notched or otherwise modified without written design approval. This rule applies even when a service, flue or roof window clashes with a member.
Stop work in the affected area and provide photographs, dimensions and the truss reference to the supplier. A designer can assess the issue and issue a repair or revised detail where appropriate. Site improvisation may move forces into members or joints that were not designed to receive them.
Add practical hold points
A small number of planned inspections can prevent repeated defects. Useful hold points include:
- supporting structure checked before erection;
- first truss position and temporary stability accepted;
- spacing and plumb checked during the run;
- girder and special truss connections inspected;
- permanent bracing checked before concealment;
- wall and gable restraint completed;
- reported damage or alterations closed out;
- final photographs and marked drawings stored.
Allocate each check to a named role. Record the date, plot and drawing revision. Photographs help, but they should show the relevant detail clearly rather than merely proving that someone visited the roof.
Brief every person who affects the roof
The erection supervisor should brief installers on the layout, sequence, temporary stability and permanent bracing. Follow-on trades also need to understand that they must not remove braces or alter members to gain access.
Keep drawings where the team can use them. If a revised document arrives, withdraw the superseded version. Good document control prevents one crew from following an old plan while another works to the latest issue.
Nuneaton Roof Truss designs and manufactures roof packages with project-specific layouts and supporting information. Review our roof truss service and manufacturing process.
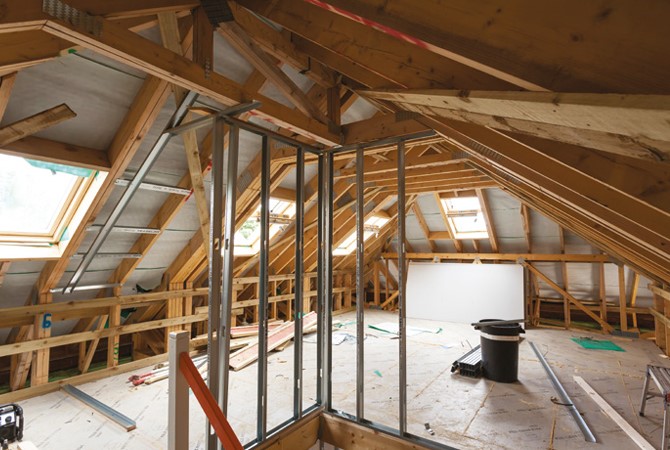
Make stability visible from the first truss
Effective roof truss bracing comes from preparation, not a last check before handover. Plan temporary stability, install permanent members to the approved details and inspect the work before it disappears. For a coordinated roof package and project-specific design support, send your information through the Nuneaton Roof Truss quotation page.